Basic Hardware with Optical Switches and CNC Machines...BeagleBone Green

This is a call to people that understand the optical isolation of building around these types of switches.

I have this CNC Machine. The homing and limits are done in source but rely on an optical switch.

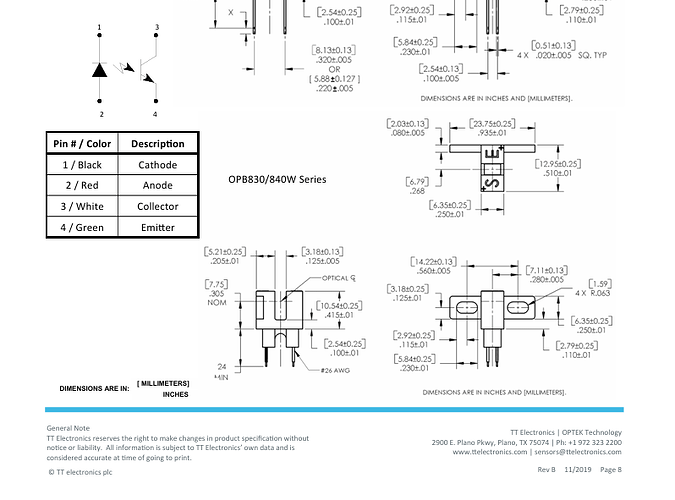
These specific optical switches are four wire, OPB830 and OPB840 (L and W) in the W package.

So, there is a collector, emitter, anode, and then the cathode.

The more I read the datasheet, the more I am thinking of replacing them entirely with simple push button limit switches.

Anyway, if you have some expertise in Anode/Cathode/Collector/Emitter ideas for a four wire limit switch of the optical type, please jump in if you find time.

So far, the machine is knocking like the connection from the limit switches cannot accept the home position or any other position. They are tripped obviously.

How are they tripped is my question. There is nothing in the way to trip them. I have a slotted optical switch that a rectangular bar slides into to trip them.

The motor knocks in the machine no matter what I do with wiring and software. Dang it, I may just have to go to two wire NC switches.

Seth

P.S. Anyway, this may be a fun subject to discuss. In the meantime, I will reread emitter-collector ideas and Anode and Cathode behaviors again.

There in the datasheet is where I found this hardware related portion. Off to read more!

So, my slow and steady research tells me two to four things…

  1. Anode in the W package of these optical switches are in relation to positive.
  2. Cathode is negatively flowing electrons.
  3. The collector is a “collection” of electrons passed from the return line.
  4. Finally, this emitter is a emit of electrons once the build up of electrons reaches a specific criteria.
    a. For instance, when our beam gets broken by the rectangular bar passing into it.

Although simplistic in theory, wiring it has been a major hurdle for me so far. Luckily, no rush here.

Seth

P.S. So, we have power of the switch, a reference voltage of the switch (GND), and two activated portions that create a build up and then a release when a beam, in this case, is broken up by a piece of metal.

Please correct me if I am incorrect. I am still learning about how to optimize this switch in a way that is rewarding for me, the build of this machine, and theory in general.

Oh!

Output Phototransistor 
Collector-Emitter Voltage 30 V 
Emitter-Collector Voltage 5 V 

So, I am at a loss with that statistic. Is that if I change the wiring or if I port 5v to the machine switch versus 30v? And…just for reference, those voltages are maximum…

In reality electrons flow from negative to positive, the convention is positive to negative. Unless you are a physicist the positive to negative convention is most useful. It was a discovery after everyone assumed positive to negative direction so the original convention is still used.

On pin 2 you will need a series resistor if it does not have one in the package.

Depending upon your design a mechanical limit switch might be a better option since it is much simpler to wire your e-stop and your safety factor is more reliable. If you are running open loop steppers a mechanical limit/e-stop would be a good idea. For your home switch(s) on x,y,z, best option would be an optical. A magnetic prox switch is another option if you can keep the chips away from it. If you plan on running coolant a mag prox would be a good choice. The optical ones need to be kept clean, coolant mist will settle and leave a residue on lenses then the machine will not home out when restarted because it looks like it is at the end stops.

2 Likes

Yeppers and Yeppers,

@foxsquirrel…So, I have already detached one optical switch.

I am not sure exactly (so far) why the Acorn CNC headers for the DB25 are not responding well to the optical switches. Anyway, off to print an adapter. The endstops for this laser XY axes need to be exactly 2mm offset of where they would normally be attached. Blah…

So, I appreciate your ideas and the optical switch parts to the beam being disrupted are an okay solution because of how they managed to incorporate a rectangular bar to slide in and out of it.

This CNC is for a Laser PWM enabled motion parts.

Seth

P.S. Off to try my adapter!

Just an Update,

Outside of being smart, some people like to alter things in other peoples’ lives without permissive values.

This is what I am saying… The person altered my motor configuration on the hardware side…

This caused magic smoke and other issues in my mind that were not reality. Anyway, all is dandy now and the new end stops are on the machine. I am sure the Acorn CNC people have heard enough from me already. I sent in another post on their forums to coordinate something outside of burnt out drivers.

Blah…

Seth

P.S. @foxsquirrel , thank you for your support. Wires are wires but when they are in the incorrect configuration from some secret source, this nuance of an individual, my brain goes wacky. Blah. Thank you again…

1 Like

Your optics are perfect for that.

MAKE SURE YOU ARE WEARING SAFETY EYE PROTECTION APPROVED FOR LASER PROTECTION

The reflection / refraction is just as strong as the incident beam.

1 Like

Thank you for saying so, i.e. as I need to see!

Seth

P.S. I have some for a cheaper laser and then I have some for Plasma! Watch out Sun, Seth is on his way to clean and clear vision… I just need to make sure this time and every time is when I need to wear them.

Also, I noticed there are different tints and angles of specific nm (nano meter) of visibility and radiation in relation to glasses/goggles. I know…I was not prepared and now I am fully prepared. Geared up and sights are looking good! I use ! to show excitement and it is often conferred in a lack of understanding.

Trust me, at times, I would have rather got a book and learned from scratch how to do everything I am interested in currently. Luckily for me, books are still available! At first, I was reluctant. I was unaware of the disorders of vision caused by nano meters of light at up to 1mm.

https://ehs.princeton.edu/book/export/html/348

If you see the top left corner of the .edu site from princeton, one can see they collected some valuable data about safety surrounding lasers. Sheesh…all of what I could have done differently if I only knew whatever whenever now or wait…then! Enough from me now. I am in gibberish mode.

Yes, and don’t buy the cheap stuff on amazon or ebay. Pay more and buy them from a credible source that has an impeccable chain of custody of the goods.

Plasma table is not quite as dangerous but it still needs proper eye protection.

Amen to that.

Already done and sourced. I have three pair of different types.

  1. IR5
  2. Then…some for brazing
  3. Some other IR5 types, too

The more I read, the more I learn. I keep finding new, inventive ideas regarding lasers, safe use of such a tool, and how terrible everyone is at mechanics when taking no time to learn.

Please take this idea and abide by it (if you want)…

Quarter turns only with screw drivers, hex keys, and hand style hexalobular (Torx) wrenches.

Just a quarter turn only is all it takes. When that vacant idea, I say vacant because of the technology and other ideas (lazy maybe), stays vacant and does not reside in approachable methods…

Bam, error!

For instance, if I am using a longer than average fastener for my application, a hand tool would be out of the ordinary and a quarter turn would be simply too much to withstand in patience and time.

If it is too short, well. Faulty fastening takes place. Anyway, long story short here…

I have rushed before today to get what I wanted in life. It is never so easy, i.e. as I am sure you are aware.

Frustration, anxiety, and dumbness are bundled together to create a poor working machine of sorts.

I know. First hand, I know. Second hand, I definitely know. It is easier to blame others instead of learn from their mistakes. Anyway…

IR5 is what I found for laser nm and plasma cutting for metals. I need to research more like you have clearly stated. I am not taking this lightly. I understand that without my eyesight, I am sort of without vision. Literally, I guess is a more stern warning to those of us whom enjoy lasers with raster and vector.

I did research a while ago. My research led me to many sites online, I live in oil boom/bust areas, that had the goggles or glasses at a premium price. I was surprised.

I will be researching more on the IR5 glasses and goggles I acquired through the inexpensive trade online. Luckily, a 15w diode laser came with protection for it. The CO2 laser came with glasses but they have disappeared recently I believe.

I hate blaming others of missing parts but I live here! I know!

Seth

P.S. I was thinking someone like Lincoln or other distributor of hard to find glasses for my 40/45w laser would be beneficial but I am going to bite the bullet on this one and just bear the price… Aw! ha.

ANSI Z136 is what I need to understand to get my glasses.

I see some that handle nm and radiation all together in one combination.

I will be doing some more research before pressing the PWM button!

Seth

P.S. Here is a distributor I found online… Please remember I am from boom/bust town. So, my intellect is okay but my known reads on lasers is sparse at best.

So, here we go…

update

Do you think that this would be an okay purchase for a 40w gas/CO2 laser?

So, I have been ballparking it on the nm and wavelength of the gas laser.

another update

Not any longer…I have contacted the mfg. and/or distributor of the laser and will gladly and hopefully get a service return on the wavelength. No more hypothesis. Straight facts…Jack(s).

A few others, you will need to have a halon fire extinguisher (use this one first) and a dry chemical for last resort if the halon does not put it out. I know from first hand experience with this . A supplier sent us the wrong material and it caught fire, it made a mess of the laser. Second time it caught fire, is still a mystery. It does happen so be prepared.

If you are going to cut wood and some plastics the Co2 is the best wavelength. If you plan on marking stainless or aluminum a fiber laser with a galvo head is the best for that. You can mark anodized aluminum with a Co2 but it is not crisp and white color like you get from a fiber laser.

40 watt is pretty good, you can cut 3/16 thick acrylic with that and wood I don’t know. Our Co2 is 25 watt and it will cut balsa wood and 1/8" acrylic. ( planned on cutting out balsa wood parts for the model airplanes when I retire)

Yea…

@foxsquirrel , this laser cuts and does or did a fine job at engraving parts.

It does nothing to aluminum, i.e. anodized or not. I found some burn on paints with a specific type of alcohol that melts into the “pores” of the metal. It is really a bake on feel of sorts.

I have had this one since 2015 and tomfoolery got the best of me. Others were quick to disengage wiring that was detrimental to the workings of the laser and the software…anyway.

So, without thinking that someone would sabotage the get up, I took it completely apart and found little to no help anywhere. Then, BBG! Back at it!

I can cut 1/4" woods with the laser and cut 1/8" plastics like HDPE and others…

One day, poof. No more. The machine refused to work. All the electronics were placed well in the inside compartments of the machine. Testing became labor and a chore. So, BBG!

It is like the Sun stopped shinning for a split second do to the Moon.

Yeppers, Balsa and other 1/8" and 1/16" woods work well. My plan on this model of laser was pure fanatics but I grew to like to make things with it. I even found parts online of crosses that I was going to cut out of plastics to make the BBBlue hexacopter from ArduPilot.

That is when things went “South”. Bamboozled and sabotaged to the core. Blah.

Some people…

Yea…galvo is beyond me for now. My income stayed and inflation rued the day of my payments! Argh and garble.

So yep, the Acorn is up and running. I will invest in OD instead of IR lenses for some safety measures here this time and forever when using a machine like this one.

The IR is more for plasma cutters like when welding with that wavelength of 200 nm to 1400 nm.

I am slowly learning the difference of my “keen” insight into the journey of follies until classified as “sought” or at least useful.

I had some big plans on the BBBlue when it came out and that fellow that ported the armhf port from the ArduPilot source to the am335x. Pure bliss. I was chatting with people, making “waves,” and trying to find out how I could be part of the local chapter of amateur flyers.

Although the local chapter is more on what you plan on doing after retirement with rotors and planes, I wanted to introduce something I thought the world could have with them if needed.

Like, flying BBBlues for leisure activities, learning Linux as a portable OS, and software infrastructure.

Seth

P.S. I think I made the wrong “waves” within the community of ArduPilot at first. It was even told that one fellow/lady/online personality said they would post me as a bug in the community. Ha. I yelled at the wall for 10 seconds and then got over it. I think I would like to take back what the wall heard but in future reference, count to 10 and not yell for 10. Ha.

update

I was not well received as a Copter Pilot at the local chapter or at the local shop where I found the chapter to be located near me.

So, in hindsight, I think I saved myself a life lesson and learned along the way! But! But! But! If there are more drones in store, I would triple-love to rehash the builds!
Your lens is out of focus or damaged, if you can cut 1/8" acrylic you can burn off the anodize and expose the matte gray finish of the aluminum. Make sure all your optics are clean, the final lens usually gets foggy/smutty and needs to be cleaned frequently. Marking aluminum requires maximum power density, that means all the energy into the smallest diameter dot.

You can get “coupons” on ebay, a/k/a anodized blank business card or pet tags pretty cheap. When I set up a new job I use a black marker on the bare aluminum and burn that off. It gets costly trashing a new part every time it is set up.

I was flying RC helicopters back in the days before the rate gyro on the tail rotor was developed. If I had the hardware back then that we have now its hard to imagine what I would have came up with. Still have the GMP cricket that I totally flattened out and my Dad actually straightened out every piece so I could fly it again.

1 Like

@foxsquirrel ,

Hey there…I found out through the company that mfg. the parts, bot, and laser (gas) that all CO2 lasers seem to emit the same “hue.”

10,600nm

10,600nm of the spectrum calls for a dedicated piece of eyesight protection. yes. You were right but as the mfg. of this part(s) seems to believe, the acrylic or “plexiglass” flip top seems to take care of the issue which I was not aware of during the use or the uses.

Seth

P.S. So, I wrote them back. I thanked them and then, um, said something about what exact type of glasses/goggles would I need to get. They do not market specific glasses for their hardware and bots. So, that fell short but I know how to look up nm at 10600 and how it relates to lasers…

1 Like

Finally, you get the view of the laser and the “mechanics” while seeing the Acorn CNC and BBG in action!

Seth

P.S. I have not hardwired the laser to the system, preliminary testing only. Enjoy!

@foxsquirrel , there it is in all its glory! I even put in some cheesy, retro and well-timed graphics…

1 Like

That is cool.

1 Like

Yeppers, @foxsquirrel

I will be adding the wiring for the laser soon to test out the capabilities of it all. Cool is right. Sinter cool!

Seth

1 Like