Some thoughts and findings as I begin to learn the BBG (Beaglebone Green)
- The first tutorial blinking the four onboard leds.
I did the tutorial using bonescript and also by using echo > at the prompt to change the corresponding files ( /sys/class/leds/beaglebone:green:usrx)
ISSUE FOUND:
One thing I wrestled with was the leds by default do not follow the predescribed operational pattern. Echoing “none” to the trigger files and other changes to the bonescript did not have any affect.
The leds would continue to alternate 1,3 lit then 2,4 lit. It was obvious that something else was writing to the leds and was interfering with the tutorials.
SOLUTION:
I found that if I connected to the BBGw with my phone and clicked “done” every time the BBGw is turned on or reset, the leds would then go back to their stated mode of operation. and allow the tutorials to work properly.
End entry 1.
- playing with stepper motors.
I hooked up a nema 17 stepper motor via a DRV8825 Stepper Motor Driver basically using the same led tutorial bone script to drive the GPIO pins to run it.
The DRV8825 current limit instructions and youtube videos are unclear how to set up. I learned the hard way and wrecked a few of them in the process. The way i found to set them up was to wire them up completely under no power (make sure to use the 3.3VDC power from the BBG and do not use the 5VDC) with the motor disconnected. Then power them up first the BBG then the external power supply for the stepper motor. Then the correct voltage between the ground (common BBG and external PS) and the potentiometer cover can be read.) I set the voltage to .6VDC for testing.
ISSUE FOUND:
Bonescript is not really fast enough or even intend to run stepper motors by togging the pin outputs. Even at slow speeds there would be numerous missed steps and poor behavior. My oscilloscope showed this to be true at the BBG and not after the DRV8825.
SOLUTION:
Don’t us bonescript. Now the fun begins, next try Python.
End Entry 2
3) playing with stepper motors - Python
My next try was to use python as there are many included examples with the Cloud9 IDE.
ISSUE FOUND:
Importing the BBIO library causes the python program to crash. Apparently, BBIO is not yet compatible with the linux kernel (4.x) the BBG ships with. Almost all the python tutorials rely on BBIO and there most are broken.
SOLUTION:
I did not try using an older beaglebone image as I was worried it would loose the WIFI functionality of the BBG. instead I tried using the MRAA library in python
import mraa #Python script
4) playing with stepper motors - Python
I first mimicked the bonescript to us the GPIO pins to run the stepper motor. I noticed I could run it faster than I could with bonescript, but would still get the same issues just at better speeds. I then tried setting the pin to run as a PWM output.
ISSUES FOUND:
USING GPIO is not a good solution for running stepper motors.
Issuing the mrraa.write(0.xx) would cause a buffer overrun when setting the PWM duty cycle and crash the program,
Using pin.pulsewidth_us(xxx), pulsewidth_ms(xxx), or pulsewidth(x.xx) to set the duty cycle directly would work, but when values got out of range the pwm chip would become locked requiring the BBG to have to be reset…
SOLUTION:
-
false trail. Upgrade the mraa library (the BBG came with v 0.95) to version 1.5.x. this was pretty tough for an absolute beginner like me. Needed swig3.0, which can be installed using debians dpkg. Need Cmake which was somewhat difficult to get an image of with out having an sd card. it took some time to get it installed. mraa installs files in sys/local/lib vs sys/lib like cloud9 expects to see. Once mrraa was installed, i had to correct ly place a few files to get it to work, but mraa 1.5 would fail to initalize pwm on the pins, I dont know why as using mraa commands to check the pins always returned correct values, but it still failed.
-
current state. I bought a micro SD card and installed the latest BBG image on the eprom. This came with mraa1.0. Still all the BBIO python examples are junk. You no longer get a buffer overrun using mraa.write(), but you can still lock up the pwm.
End entry 4
The bonescript stuff is cool and the way it works with the webserver is fascinating.
It’s possible you may hit a few limitations quickly. I think you might already be there.
So next, get Derek Molloy’s outstanding book “Exploring Beaglebone”.
Start reading and trying the examples in this book.
A first order of business is to flash a micro-sd card with one of the latest Debian images.
Don’t use a “flasher image”. The flasher image will write itself to the flash memory on the board.
You can leave that intact for now and get work done on the microsd. If it gets trashed it will not be a disaster.
Later on, when you start working on a serious project, you can create a git based project and push it to a local
or remote server for backup.
Great choice on the Green, best one to start with. Enjoy the adventure!
Regards,
Greg
- Useful links so far.
mraa API
http://iotdk.intel.com/docs/master/mraa/python/mraa.html
Installing gzip packages in linux
http://www.howtogeek.com/howto/uncategorized/linux-quicktip-downloading-and-un-tarring-in-one-step/
DRV8825 wiring
https://www.google.com/url?sa=i&rct=j&q=&esrc=s&source=images&cd=&ved=0ahUKEwinpaCL86bQAhVHLmMKHTSUDbcQjRwIBw&url=https%3A%2F%2Fwww.pololu.com%2Fproduct%2F2133&psig=AFQjCNHfawLO3bcXp0kBk-BSjhkyHYlGRQ&ust=1479166590204138&cad=rjt
Beagle bone OS images
http://beagleboard.org/latest-images
Cmake
https://cmake.org/install/
BBG mraa pin mapping
http://www.seeed.cc/project_detail.html?id=1592
End entry 5
doing real time things in userland dont work well.
Using the PWM is the best way to step motors
http://exploringbeaglebone.com/
Note the “Chapters” in the upper right. There is a huge amount of info here!
On the BBGW, this is the signal that wifi isn’t connected to an AP. This was a choice made by Seeed for their out of box experience.
Regards,
- PWM experiments
I wrote three python scripts to run pwm on mraa pin 62 (P9-16). Remembering the mraa library is now v1.0 and not 1.5.
period range max <1 sec. min 1us (using _us)
when using .write() to set the duty cycle results in some screwy things happening and locking up of the pwm chip. I quickly decided it is best to us .pulsewidth() to directly set the value.
pulsewidth(), pulsewidth_ms() minimum value cannot be less than 1ms (.001sec) the max cannot be more than the period.
I had the best luck with “_us” range, and did not experience pulse width related hardware/ software crashes.
I could get the pwm chip to generate signals from 1us period to 1x10^6 us period, that i could see on my scope.
import mraa
print (mraa.getVersion())
set up pins to run stepper motor pulse & direction
pin = mraa.Pwm(62)
pindir = mraa.Gpio(59)
#set initial direction of motor, 1st tell pin that it is to send a signal (dir), then write value (0 or 1)
pindir.dir(mraa.DIR_OUT)
pindir.write(0)
variable to set frequency and pulse width for testing
period = 100
#enable the pwm pin
pin.enable(True)
initialize the pin
pin.period_us(period)
#set the pulsewidth to 25% of the period
pin.pulsewidth_us(int(period/4))
#program loop it is not necessary to write to the pin every loop
while period <> 0:
period = input("integer(us)number /0 to quit: ")
pin.pulsewidth_us(0)
pin.period_us(period)
pin.pulsewidth_us(int(period/4))
a bit of clean up
pin.enable(False)
Period 1 us
7)Setting up a link sprite LS-Y201 camera I bought.
It took some time to get the UART pins to work on the BBG.
ISSUE FOUND:
The UART pins are not enabled by default as UART pins. I tried several methods, and ended up following the instructions posted here (http://tinkernow.com/2015/01/beaglebone-black-rs232-uart-setup/) to set up and test the pins.
SOLUTION:
Changing adding the pins to the /boot/uEnv.txt file allowed the minicom test to work.
You cannot install minicom with apt get / dpkg until you update the package library (apt-get update) at the root dir
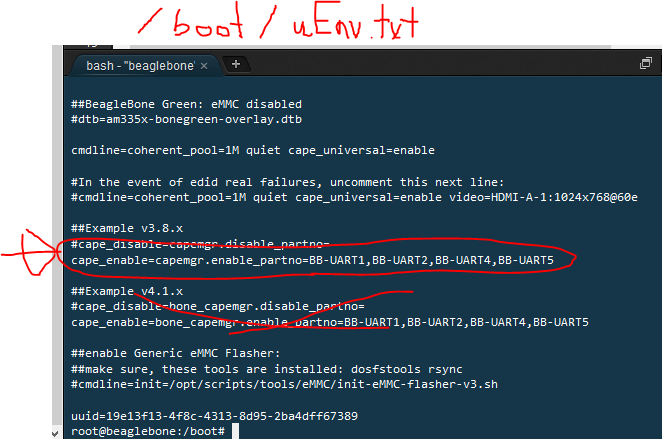
end entry 7
- Setting up a link sprite LS-Y201 camera continued.
Some searching on the internet lead me to this site( http://bradsmc.blogspot.com/2013/05/taking-larger-pictures-with-pcduino.html).
I used his work to create two python programs 1st to take pictures and the 2nd to change the picture sizes. (Ill post them sepaerately)
ISSUES
LINKSPRITE CAMERA changing the baud rate not very intuitive. soem time the change is persistent othertime not.
SOLUTION
Always set the baud to default on exit.

import sys
import serial
import time
import datetime
# Initialize camera (LINKSPRITE LS-Y201 JPG w/ IR)
ser = serial.Serial(port = “/dev/ttyO1”, baudrate=38400)
#Rest the camera (HEX 56 00 26 00)
ser.write(b’\x56\0\x26\0’)
resp = “”
#DELAY TO ALLOW camera to fill response buffer
time.sleep(0.5)
#Read the Response from the camera and check for String
resp=""
while (ser.inWaiting() > 0):
data = ser.read()
resp += data
if “Init end\r\n” in resp:
print “Camera Reset”
# Set Baud Rate
# 115200
ser.write(b’\x56\x00\x24\x03\x01\x0D\xA6’)
# 57600
#ser.write(b’\x56\0\x24\x03\x01\x1C\x4C’)
# 38400
#ser.write(b’\x56\x00\x24\x03\x01\x2A\xF2’)
# 19200
#ser.write(b’\x56\x00\x24\x03\x01\x56\xE4’)
#DELAY TO ALLOW camera to fill response buffer
time.sleep(.01)
#change UART PIN baudrate to match camera
ser.baudrate = 115200
#Read the Response from the camera and check for String
resp = “”
while (ser.inWaiting() > 0):
data = ser.read()
resp += data
if b’\x76\0\x24\0\0’ in resp:
print “Baudrate changed”
# Take picture
# Command (HEX 56 00 36 01 00)
ser.write(b’\x56\0\x36\x01\0’)
#DELAY TO ALLOW camera to fill response buffer
time.sleep(.01)
#Read the Response from the camera and check for String
resp = “”
while (ser.inWaiting() > 0):
data = ser.read()
resp += data
if b’\x76\0\x36\0\0’ in resp:
print “Picture taken”
#Get JPG size
# Command (HEX 56 00 34 01 00)
ser.write(b’\x56\0\x34\x01\0’)
#DELAY TO ALLOW camera to fill response buffer
time.sleep(.01)
#Read the Response from the camera and check for String
resp = “”
while (ser.inWaiting() > 0):
data = ser.read()
resp += data
if b’\x76\0\x34\0\x04\0\0’ in resp:
if correct return string is read the next two reads will be size
msb = ser.read()
lsb = ser.read()
print “Image file size: %d bytes” % (ord(msb) << 8 | ord(lsb))
# Write image to file
# Command to Read jpeg data (HEX 56 00 32 0C 00 0A 00 00 00 00 KH KL 00 0A)
ser.write(b’\x56\0\x32\x0C\0\x0A\0\0\0\0\0\0%c%c\0\x0A’ % (msb,lsb))
# DELAY to allow camera to fill buffer with picture data bigger files need more time
time.sleep(.01)
# Create a unique file name and save it to where you can get it from cloud9 ide
now = datetime.datetime.now()
filename = “%d.%02d.%02d.%02d.%02d.%02d.jpg” %
(now.year,now.month,now.day,now.hour,now.minute,now.second)
resp = ser.read(size=5)
if b’\x76\0\x32\0\0’ in resp:
with open("/var/lib/cloud9/pictures/" + filename, ‘wb’) as f:
while (ser.inWaiting() > 0):
data = ser.read()
f.write(’%c’ % data)
print “Image written to /tmp/%s” % (filename)
# reset the Baudrate to default 38400 and close the serial port
ser.write(b’\x56\x00\x24\x03\x01\x2A\xF2’)
ser.close()

changing the picture size
import sys
import serial
import time
# Initialize camera (LINKSPRITE LS-Y201 JPG w/ IR)
ser = serial.Serial(port = “/dev/ttyO1”, baudrate=38400)
#Rest the camera (HEX 56 00 26 00)
ser.write(b’\x56\0\x26\0’)
resp = “”
#DELAY TO ALLOW camera to fill response buffer
time.sleep(0.5)
#Read the Response from the camera and check for String
resp=""
while (ser.inWaiting() > 0):
data = ser.read()
resp += data
if “Init end\r\n” in resp:
print “Camera Reset”
#change size
# The camera must be reset or have the power cycled for this to take affect
# Probably should be a separate program, only run one time,
#640x480
#ser.write(b’\x56\0\x31\x05\x04\x01\0\x19\0’)
#320x240
ser.write(b’\x56\0\x31\x05\x04\x01\0\x19\x11’)
#160x120
#ser.write(b’\x56\0\x31\x05\x04\x01\0\x19\x22’)
time.sleep(.5)
while (ser.inWaiting() > 0):
data = ser.read()
resp += data
if b’\x76\0\x31\0\0’ in resp:
print “Size changed must cycle camera power or reset”
#Rest the camera (HEX 56 00 26 00)
ser.write(b’\x56\0\x26\0’)
resp = “”
#DELAY TO ALLOW camera to fill response buffer
time.sleep(0.5)
#Read the Response from the camera and check for String
resp=""
while (ser.inWaiting() > 0):
data = ser.read()
resp += data
if “Init end\r\n” in resp:
print “Camera Reset”
- More useful links
Camera user manual.
http://www.linksprite.com/upload/file/1274419957.pdf
Camera programming python examples
http://learn.linksprite.com/pcduino/arduino-ish-program/uart/taking-pictures-with-a-pcduino-a-linksprite-jpeg-color-camera-ttl-interface/
UART setup
http://tinkernow.com/2015/01/beaglebone-black-rs232-uart-setup/
https://raw.githubusercontent.com/SeeedDocument/BeagleBone_Green/master/images/PINMAP_UART.png
- things to install and update after image is installed.
Mount an external sd card for extra storage.
df -h
tells you what is mounted
fdisk -l | grep ‘^Disk’
Disk /dev/mmcblk1: 3.7 GiB, 3909091328 bytes, 7634944 sectors
Disk /dev/mmcblk0: 7.4 GiB, 7948206080 bytes, 15523840 sectors
tells you all the storage devices
manage partitions
`# fdisk ```/dev/mmcblk0``
format partition (``mmcblk0p1)can change depending on situation
# mkfs.ext3 /dev/``mmcblk0p1
mount the disk at a new folder
# mkdir /extsd
# mount /dev/```mmcblk0p1 /```extsd``
update apt-get
apt-get update
install cmake again
spent the weekend trying to get a usb web cam to work with python
there are many false trails on the internet. ended up following
http://www.chioka.in/python-live-video-streaming-example/
https://github.com/log0/video_streaming_with_flask_example
and
https://blog.miguelgrinberg.com/post/video-streaming-with-flask
installed pythons opencv
took some time to get things too work.
time out error was solved by
http://stackoverflow.com/questions/27769561/opencv-python-cv2-videocapture0-grab-and-cv2-videocapture0-read-hangs
using mjpeg compression relies on the BBB to decode (tobyte() command is really tostring() command. making live streaming very slow and laggy.
began to explore opencv with neon per
http://blog.lemoneerlabs.com/3rdParty/Darling_BBB_30fps_DRAFT.html
and
http://vuanhtung.blogspot.com/2014/04/and-updated-guide-to-get-hardware.html
after installing opencv per their instructions i kept getting a file too small error when importing cv2
decide try to reinstall debian image and start over.
http://www.tecmint.com/useful-basic-commands-of-apt-get-and-apt-cache-for-package-management/
more commds to upgrade your installed software packages